When the service technician installs the unit, he or she will set up the bed according to the patient's height and weight. The unit is set up solely for the patient; others should not lie on the unit.
The presence of others on the unit could result in patient injury, personal injury or equipment damage.
GROUNDING INSTRUCTIONS
WARNING: When using this product in the home, use a properly grounded, three-prong, 120 volt outlet. Failure to ground properly could result in personal injury, fire or house wiring.
SHOCK HAZARD: Position the power cord to keep people from tripping over it. When the
product is not in use, properly store the power cord away from traffic areas. Failure to do so could result in personal injury.
This product must be grounded. in the event of an electrical short circuit, the grounding reduces the risk of electric shock by providing an escape wire for the electric current. This product is equipped with a grounded power cord and a grounded plug. The plug must be plugged into an outlet that is properly grounded
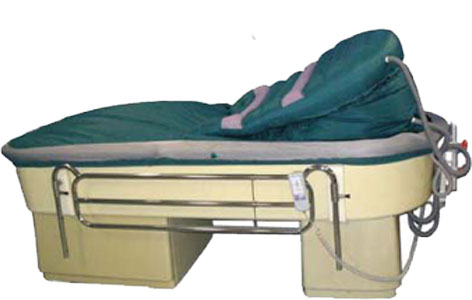
PRODUCT FEATURES
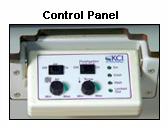
MAIN CONTROL PANEL
The main control panel al the foot of the bed contains the main buttons for operating the bed.
Fluidization Control - Allows user to control the blower speed (full throttle is recommended at most times)
Temperature Control - Allows .the user to control temperature range from 80 to I 00 degrees
Lock-Out Mod e- Press this F!uidization Lock-Out mode to disable the fluidization on/off button on the remote hand control, as required
Note: Fluidization Lock-Out mode should be used at the caregiver's discretion to ensure against unintentional deactivation o of fluidization from the Remote Hand Control.
REMOTE HAND CONTROL
Inflate/Deflate Air Pillows with ON/OFF Button
On/Off Control - activates or inactivates fluidization
FILTER SHEETS AND COVER SHEET
Filter sheets (there are two) are the front line barrier between the microsphere beads and the patient. The cover sheet then is placed directly on the filter sheet and is the surface that the patient lies on. Do not pin or clamp items to the filter or cover sheets. Also, cigarette burns, tears caused by sharp objects and pinholes can cause bead leaks. Patient injury, personal injury or equipment damage could occur if beads were to leak through filter and cover sheets.
AIR PILLOWS AND WEDGE CUSHIONS
The Air Pillows provide upper chest elevation and are controlled with the included Hand Controller. Additionally, Slant Wedge Cushions can be provided on demand. The Wedge Cushion pillowcase can be washed with regular detergent to provide adequate hygiene.
BEADS
When the FluidAir™ bed is operating the beads become fluid-like and conform to the shape of the patient's body to help relieve pressure. The FluidAir™ bed handles limited amounts of fluids passing through the filter sheet. To contain drainage, use absorbent material or breathable underpads without plastic backing. Excessive incontinence and bodily fluid saturates the beads and hinders fluidization. Petroleum-based topical ointments and silver compounds ruin the coating on the beads and pem1anently destroy their fluidizing properties. Take care when utilizing these types of products.
SIDE RAILS
The side rails are intended to be a reminder to the patient of the unit's edges, not a patient-restraining device. Keep the side rail in the up locked position when the patient is in the bed.
DRAINAGE BAG HOLDER
A drainage bag holder is provided on the side of the FluidAir™ for patients with foley catheters |